Hard and Soft Skillsets

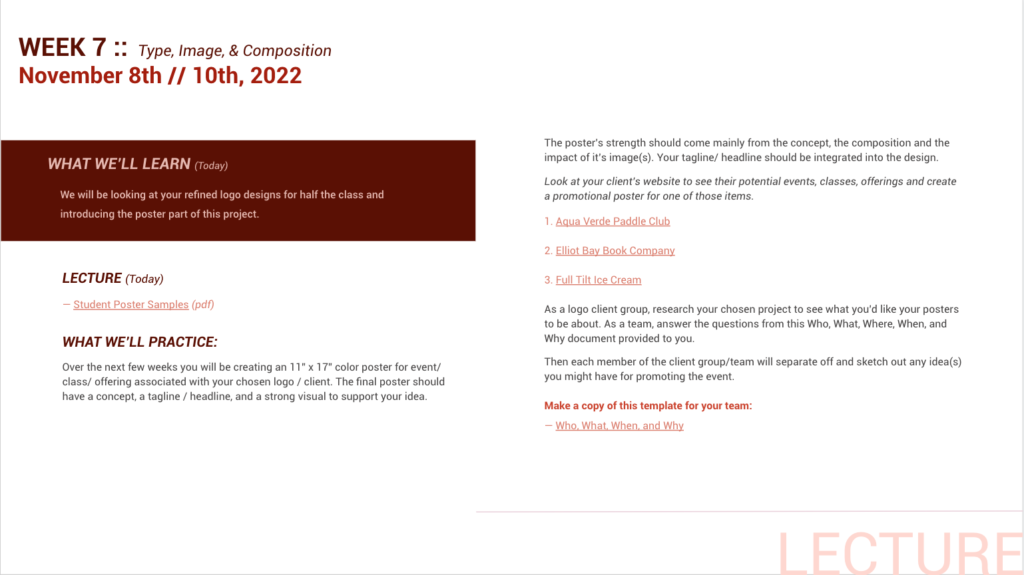
My Top Three Hard & Soft Skills

Hard Skills

Typography — A good understanding of typography is crucial for the success of a graphic designer, and plays a critical role in effective visual communication.

During my first two quarters, the projects that I’ve received the most postitive feedback on were the ones where I leaned into my instinct of using type as a key feature to my designs.

Color Theory — A good understanding of color theory, and how it is used to create mood, convey emotion and pull focus is a another key skill of a successful designer.

This is another area of design that I feel is a strength which I hope design school will only deepen further. I think my use of color is one of the reasons I was granted admittance into this program. Growing up on Molokai might have something to do with this. There we see in technicolor. A lesson I’m trying to incorporate into my current designs in the program is the usage of a limited number of colors. I believe this has helped to only strengthen my application of color to my projects.

UX/UI Design — Understanding of user experience (UX) and user interface (UI) design is a definite asset for graphic designers today, especially if interested in web and mobile design (which I am!)

I think this is a strength because I enjoy dabbling. And frequently visiting inspirational sites showcasing websites and mobile design. Plus I enjoy understanding people’s motivations.

As a side note, I’m hoping that during my time in the program I can invest some time reinterpreting an old dream of mine: making a mobile app to help tennis players find and connect to play matches.

Soft Skills

Communication — Strong communication skills are important because we often work with clients and team members to convey ideas and receive feedback.

I think this being a strength of mine is partially why I’ve always done so well in sales careers. Being persuasive is key. And knowing how to navigate many different kinds of personalities is critical. I hope this skill set will serve me well in my design future.

Adaptability — As design industry is constantly evolving, we must be willing and able to adapt to new technologies, trends, and client needs.

Growing up on Molokai, having to discover clever ways to survive and to solve problems without all the usual resources has helped to build my adaptability. I’ve always found that it has helped me throughout life.

Attention to Detail — Graphic designers must pay close attention to detail to ensure that their designs are accurate and meet the client’s requirements.

This might be the OCD in me, but I’m very good (usually) at paying close attention to detail. In some ways, I enjoy it. Even though at times it can be tedious.

Top 2 Hard & Soft Skills: A Work in Progress

Hard Skills

Technical Proficiency — Graphic designers should have strong technical skills in industry-standard design software such as Adobe Creative Suite (Photoshop, Illustrator, InDesign), Sketch, or Figma. This is partially why I decided to apply to this program. I needed a structured way to learn this applications.

Branding — Knowledge of branding and how to create consistent visual identities for clients is a valuable skill for graphic designers.

Soft Skills

Collaboration — Graphic designers often work as part of a team, and strong collaboration skills can help them work effectively with others.

Creativity — A strong sense of creativity and an ability to think outside the box is essential in my chosen field, to come up with original and visually appealing designs.

Networking

VIDEO

ROUGH SCRIPT

Jacob: Excuse me, I couldn’t help but overhear that you mentioned backpacking the Wonderland Trail this past summer. That sounds amazing! I’m a big fan of outdoor adventures myself.

Gabriel: Yeah, it was a great experience.

Jacob: I’m Jacob, btw!

Gabriel: Hi there. I’m Gabriel.

Jacob: It’s great to meet you Gabriel. I’m curious, have you done any other backpacking trips? Right now I’m currently trying to build my graphic design career around my passion for the outdoors, and I think backpacking and adventure photography would be such an ideal fit.

Gabriel: That’s really cool. I’ve done a few other backpacking trips in the Pacific Northwest, and I love capturing my adventures through photography as well.

Jacob: That’s awesome! I love hearing that. I’m a first-year graphic design student at Seattle Central, and I’m always looking for inspiration and new perspectives on design, art and culture. Do you mind if I ask you a few questions about your experience on the Wonderland Trail, and maybe if you’ve thought of ways of incorporating that kind of passion seeking experiences into your your own design and photography work?

Gabriel: Not at all. I’d be happy to chat with you about it.

Jacob: Great! Let’s grab a drink and continue the conversation.

Personal Passion Project

I keep reminding myself of why I’m here. I want to give myself the best chance possible at learning how to create a life where graphic design is my career. But I’m not the kind of person that wants to do a job simply to make good money. I never have been. In fact, I left behind a six-figure job because it didn’t feed my soul. And given how much time we spend doing our jobs, I want to merge my life passions with that of my career. Whether that be in the outdoor space, connected to fitness, the tennis world, or in the food industry, I would be happy if my lives converged.

One project that I could see myself investing time on would be working on a series of posters (maybe 3-5 different ideas) or print advertisements that promote the mental and physical benefits of being connected to the outdoors.

The gains for undertaking such a project would likely reap more than a single benefit. It would help me to conceptualize a larger scope project, thereby helping me to further advance my design skillsets. And perhaps it would be even place my work in front of the sort of business eyes that I hope to impress one day soon. Maybe helping to open up avenues I hadn’t previously thought of.

ROUGH OUTLINE (WITH TIMELINE TOO!)

A rough timeline for this personal project would look something like this.

  1. Research (1- 2 weeks) – This would be my first step, as it would inform most of the steps below very directly. There is a lot of information out there on the health benefits to spending adequate time outdoors, being disconnected from the interwebs.
  2. Develop Concept (1-2 weeks)Here I’d spend time looking for inspiration, to see how others have tackled a similar project. Mind mapping ideas for headlines, subheads, fonts that fit the theme of my posters.
  3. Design (1-2 months) – Combining images, illustrations, typography, I’d work to create posters that effectively communicate my intended vision.
  4. Write Copy (2 weeks)This might be my least favorite part!
  5. Revisions (1 week)Review and revise until my posters are ready for print.
  6. Print (1 week)!

RESOURSES REQUIRED

Based on the outline provided above, the resources needed for a project like this might include:

  1. Research materials – books, articles, studies, demographics
  2. Design software
  3. Images and illustrations
  4. Copywriting materials
  5. Printing materials

PROJECTED COST

Although I’m not entirely certain what a project like this would cost, I don’t think it would exorbitant. Especially considering many of the resources are already available to us in our program studios.

The Pivot

Guest speaker Friday is one of my favorite classes of the week. Being able to learn and glean information from working professionals is extremely helpful. And hearing from people spanning a wide range of fields only further adds to its usefulness to our growth here at the academy . It was a pleasure being able to sit back and listen to Abdul Kassamali talk about his experience in the field. I would like to think that one day, after I’m done with my education (or perhaps during it!), that I’ll be able to marry my passion for photography and film with my career in design.

He spoke a lot about the importance of planning, and that at times (many, in fact) we will have to pivot – whether that be in direction, scope, tone, etc. A change to our approach. Although my time at school is only a quarter and some change in, I’ve had a number of opportunities to learn the value of mastering these particular skills. One project that gave me a lot of issues last quarter was my final poster project for Jill’s class. Figure 1 is a description of that project.

Event poster project parameters Figure 1

The task of the project was to create a poster that promoted an event for a local business. Jill allowed us to choose which client we wanted to build out our poster idea for. I chose Full Tilt. The poster I was designing would promote their 5th Annual Sunday Fundae Social event.

When I first started working on the project, after a couple of iterative rounds of drafting ideas and sketching out possible outcomes, I thought I had a clear understanding of both the brief and the direction that I was taking the poster in. Sketching continues to be a struggle for me, but after putting pencil to paper, I started to feel a bit inspired. I was excited about being in that mode. Maybe realizing that it was possible to learn how to draw after all. Anyhow, this led me down a path that eventually ended up being a sort of rabbit hole for me, and I realized (thankfully not too, too late) that I needed to pivot. I tried everything I could (given the time constraints we were under) to make my initial idea work. But something was off, not connecting. And I soon lost confidence in it. Figure 2 is a screenshot of the last good stage of my initial idea. This is when I decided to take a different approach.

Failed Attempt Figure 2

Turns out the arch way was making things more complicated than it needed to be. Same with the font that I was attempting to work with. But because I had at that point been working on this concept for over 3 weeks, I needed to take a stab at a fresh approach to capturing the spirit of the intended poster. I had been looking at the wrong thing for far too long to continue working with those art decisions. New was now in, with only a week left till the final project was due. Jill recommended I rent an iPad from Ed, and attempt to digitally draw my poster. So that’s what I did. Taking away the archway, and hand drawing my main font really helped a lot. In the end, I that my final design piece better captures the essence this particular project. Jill confirmed my choice later, by telling me that she felt the newly designed piece was a lot stronger, with better colors and structural hierarchy. The pivot was scary, with only a week left, but I’m happy I did it, and it taught me a lot about how I would approach future projects. Figure 3 shows my final version. If I had invested the full three weeks on this direction, I believe this final version would actually be even better than it is below. Also, I do wonder what my poster would look like if I had already taken the color theory class. I’m excited to maybe revisit this once I’ve completed that course this quarter. All exciting things I know I will continue to learn here at the academy!

Success! Figure 3

Bún bò Huế – better than Phở

If you like Phở, you will absolutely LOVE Bún Bò Huế! It’s rich and bold, and is my go to for comforting soup on a cold, rainy Seattle day. Or any day of the week, really; whether cold or not. It’s that amazing. And I predict it will soon be something many people know about, and will maybe even replace Phở as their soup of choice. It’s a spicy beef noodle soup from the region of Huế in Vietnam. It’s so goddamn delicious, ultra satisfying, and literally takes all day to make. You’ll be wanting seconds (or even thirds) for sure.

A group of my best friends are first generation refugees from Laos (many of the soups they love and enjoy share similar roots to that of Vietnam, Cambodia and Thailand), and is a soup they only make during special occasions. Having been around them now for over two decades, I’ve been fortunate enough to learn how to make many of their treasured recipes, Bún Bò Huế being one of my top 5!

Below, I’ve attached a recipe that I often use as a good reference point, as many of the recipes they teach me are word of mouth, and I’ve never actually written it down. But this recipe comes from a good source, so I’d say start here if this is something you want to make. They’d kill me anyway, if was to share their family secrets!

As someone who loves to cook, I often find that after the long process I want to capture the dish in a way that entices the viewer to want to eat my food. Hopefully that was accomplished.

The tools I used for this project was my Nikon D3s, a handy dandy 50mm/1.4, and a few basic high wattage pure white light bulbs. I tried to create a dynamic shot by allowing some of the light to spill onto my scene without diffusion, flagging half the light thru a DIY diffusion board. I saw a YouTube video on it and wanted to try it out for this project. I really like the effect it made. The image seems to have life because of it. As if it was near a window, with some of the dappled light hitting areas of my scene.

I took the image into Lightroom to and did a few simple adjustments to help some of the color pop more vibrantly, but tried not to overdo it. Also, this dish made great usage of my homegrown bean sprouts. The store bought stuff just doesn’t cut it. It’s easy to do, but takes about a week. First you soak the mung beans overnight. Then you place them in a large enough jar for them to grow, all while washing them out each night so they don’t spoil. I love them, and grow them weekly. Simple nutrition. Here’s a couple of images of them.

Here’s the recipe. If you make it, please let me know. I’d love to hear what you think.

INGREDIENTS
▢2 lb (907.2 g) beef shank
▢2 lb (907.2 g) oxtail
▢2 lb (907.2 g) pork hocks
▢1 lb (453.6 g) Huế style pork sausage chả Huế, which has garlic and whole peppercorns
▢1 lb (453.6 g) block of pork blood
BROTH BASE & SEASONING
▢water I used an 8 quart pot, and added water to cover the meat.
▢24 oz chicken broth
▢12 stalks lemongrass leafy tops removed, roots smashed
▢2 yellow onions, large halved, to be removed from the broth after fully cooked.
▢3 tbsp salt
▢2 tbsp sugar
▢2 tbsp shrimp paste Lee Kum Kee brand
▢3-4 tbsp fish sauce
▢2 tsp MSG (monosodium glutamate) if not using oxtail, add 4 teaspoons
AROMATICS & COLOR
▢3 tbsp anatto seeds
▢3 tbsp neutral cooking oil
▢2 tbsp shallot sliced
▢2 tbsp garlic minced
HERBS & VEG
▢mint
▢basil
▢bean sprouts
▢birds eye chile or jalapeno
▢lime sliced
BANANA FLOWER
▢1 banana flower
▢2 cups water
▢1 lemon juiced

NOODLES
▢14 oz (396.9 g) package dried rice noodle medium or large thickness

SATÉ (SPICY CHILE CONDIMENT)
▢20 g dried Thai chile crushed
▢1/2 c neutral cooking oil
▢80 g shallot or white onion minced
▢40 g garlic minced
▢30 g lemongrass minced
▢2 tbsp Korean chile powder (gochugaru)
▢1 tbsp fish sauce
▢1 tbsp sugar
▢2/3 tsp salt
▢1/2 tsp MSG (monosodium glutamate) (I don’t add this btw!)

INSTRUCTIONS

BROTH
Clean the meat: Add all meat to a stock pot and enough water to submerge it, bring to a boil. Drain and rinse thoroughly under running water.

Add the meat, broth, lemongrass and onions to the pot and fill with water almost to the brim. Bring to a boil then drop the heat to medium-high to maintain a low boil. Add the seasoning.

Let it simmer and periodically check the meats for doneness and remove them as they finish cooking. The pork should be done after about an hour, the beef can vary between 2-3 hours.

After all the meat has removed, let it cool, then slice it. Adjust seasoning and add water to the broth pot if necessary.

Make the aromatics & coloring then add it to the pot. Boil noodles according to package instructions. Assemble your bowl, and serve with herbs and veg on a side platter.

RED COLORING & AROMATICS
Sauté seeds in oil on medium heat until the seeds give up the bright red color, then remove the seeds.
annatto seeds and oil for red coloring
Add shallots and garlic, sauté until brown.
Add all of this to the pot of broth for color.

PORK BLOOD (HUYET / TIET)
The easiest thing to do is just buy it already cooked and boil just to heat it up. If you use the raw type like we did for this recipe, cut into 1″ cubes and boil for 30-45 minutes.

BANANA FLOWER
Prepare a bowl of about 2 cups of water, mixed with the juice of 1 lemon.
Thinly slice the banana flower and add to the water mixture to sit for about 30 minutes.

SATÉ (SPICY CHILE CONDIMENT)
Weigh out the dried Thai chiles, then soak in just enough warm water to cover the chiles for 20 minutes. Drain the water.
Add all sate ingredients to a pan on medium heat and stir continuously to brown, cook, and slightly reduce the chile paste, about 30-40 minutes. If at any point it becomes too dry, you can add more oil, up to 50% of the amount we started with. Taste and re-season with sugar or salt as desired.

Let cool and transfer to a sealed jar stored in the fridge . You can add ~2 tbsp of the final product to the soup pot for a boost in flavor and color, or simply and let each person add to their bowl to make it as spicy as they’d like!

Here’s the link to the recipe for reference: https://www.hungryhuy.com/bun-bo-hue-recipe/

Space, reimagined!

I love the outdoor space we share just opposite our production labs. We are truly lucky to have that space as a way for us to connect to the outdoors, while at the same time still being conveniently close to our classrooms and professors.

However, it feels like we are missing an opportunity to turn that space into a little piece of heaven, something we can enjoy year round, and not just during the warmer months.

My idea centers around a glass retractable ceiling, similar to that of an electric garage door. The glass would be weather sealed so that we can use that space as an oasis during those few moments in our day when we get to ease our brains and take a moment to ourselves. I’d love for there to be locally sourced apple and pear trees (they smaller versions), with a wall of ferns, salal, and other popular NW flora. It would also be nice to have some form of water flow sound, maybe a kind of waterfall near the wall of plants, something eco friendly of course. In front of that wall of flora would be a cozy and large style u-shaped couch. Comfy and zen like during those long study and group sessions.

The space would also feature a raised bed garden, filled with herbs and vegetables of the season, just along the back railing.

In the middle of the space would be a large, spacious table where students could have lunch, study, read. Whatever. Near the entrance/exit door just outside the photo studio, 2-4 plush chairs would surround a toasty electric fireplace.

Materials used would ideally be sourced from small local businesses. It would be weighted heavily towards the usage of warm and inviting tones, with wood being a main element throughout.

I believe that if we were provided such a space, our mental health would greatly be benefited.

VME Exposure

First off, I’d like to say how much I enjoyed AJ Hanneld as a guest speaker. She amazed me. To be honest, each week I’m literally blown away by the accomplishments that each speaker is able to showcase during their talk, allowing us a glimpse into our future workload as well as being great examples of how to process our journey here at school. It’s also humbling to see the quality of the talent our program produces. It’s quite inspiring. So thank you for that. Each Friday, I look forward to sitting down and getting to see inside of a successful designers life, work and process. It’s a definite privilege, one I don’t take for granted.

The students in both the visual media and design programs are likely to traverse similar creative paths. Both share an intrinsic desire to tell stories using a variety of methods, tools and materials. It never surprises me when I hear stories about, for example, a photographer who is now a graphic designer. Or maybe someone use to be a graphic designer but now they primarily do motion graphics. It’s a testament to the inquisitive nature of the people that gravitate to these kinds of fields or practices. I know that moving forward in my career, I will undoubtedly have to work alongside people in the visual media industry. Our works often depend on the other for greatest impact.

To succeed in these varied forms of art and design, a large part of our job usually entails attempting to understand the motivations of the viewer or that of our client. It’s as if we are part-time psychologists. As creatives, we need to learn how to get into their headspace in order to determine how best to approach solving their problem. Understanding the needs and desires of your audience is a practiced art form, of which we get plenty in our respective programs. Seeing how other creatives achieve this is both instrumental and inspirational. It’s extremely helpful.

And as I progress in the program, I see that they are trying to help us formulate concrete methods and processes that are geared at helping us to adjust our bias and to hopefully see our client more clearly. And though the VME students use different toolsets to achieve their results, the processes have familiar tones and nuances. Like story boarding, or word associations, mind mapping. Sketching out our visions. Each tool a helpful resource for helping us to fine tune our message, and to better pinpoint clever, maybe previously not seen, solutions.

Now to be fair, both of my breakout modules thus far have been more design skill centric. First in VR, and now in interactive design. However, I know that next quarter I will be in a filmmaking module, and I’m truly looking forward to that. I’d love to see how my school mates use their tools. Premiere Pro, After Effects, light and gear choices. I’m very excited about it. And to see more closely how they brainstorm for a photoshoot or for maybe an interview. To see how they organize their information. Though still in my nascency as a graphic designer, I trust that I am in good hands. Careful and thoughtful in how they prepare us for our futures ahead.

Leadership Principles

Of the leadership principals highlighted by Margaret, one immediately stands out. And that’s learn and be curious. It also happens to be an example of something that impacts my life currently. Being in school, challenging myself to think differently and to grow as an artist has surely piqued my curiosity, while at the same time pushing myself to continually learn new and exciting skillsets. I find myself seeking out other resources to compliment what I’m learning in each class. YouTube tutorials, blogs, periodicals. It has helped me to practice the skills I’m accumulating, helping to make them stick more deeply.

Another principal that calls out to me is that of customer obsession. Just last week, while at work, I went above and beyond the call of duty to help satisfy a customers need. In fact, after the transaction was done, the customer told me that were it not for me, they would have gone to another store to purchase their espresso machine. Turns out, the lead in my department was rude to his wife, and they were walking out until I kindly greeted them and sparked up a conversation based off a t-shirt he was wearing. Fifteen minutes later, and poof, they were walking out with a $2700 machine. I loved seeing how happy they were compared with the vibe I was intuiting from them directly following their bad experience with my manager.

Being a freelance photographer in my past life (pre-covid), I’ve often worked under the principal of frugality. Having to accomplish more with less. And while it can be stressful, I’m always pleased with the level of ingenuity that it breeds. Knowing that this is something that will be important to my career going forward makes me feel at ease. It’s helpful to have already worked under these circumstances.

Having not been in a situation where I did the hiring or planned for the professional development of those hires is the one that, at present, feels the hardest to adopt. It feels like something that is at the very least 5 years into my future, which also makes it feel slightly overwhelming to consider doing. But I’m up to the challenge. And know that one day, after I’ve put in my time, I will be ready to deliver on this principal successfully.

AR Panel (Group Project)

The theme for our project was to highlight the parks of Seattle. We decided to utilize earth tones for our png designs. For my individual portion, I decided to focus on the current and upcoming events at Volunteer Park. To build my panels, I used Photoshop. I also spent some time seeking out the appropriate typography using the Adobe Font database. Initially, I was going to utilize Figma, but timing became an issue. For the animation, I wanted to focus my imagery on the main subject matter for an event happening tomorrow: the Evergreen Chrysanthemum Association Fall Show. I shot a video and took selected frames to build the gif. The audio was created by converting a YouTube video into an mp3 file. I used this site: https://ytmp3.cc/6d042/. I found that sweet vintage map of the park online as well. Maps are so cool.

Attached below are the panels for the project, as well as a video of the VR experience using my phone. I’ve also included the gif (seen above).

Credits:

Music: Hilary Hahn – J.S. Bach: Partita for Violin Solo No. 1 in B Minor. https://www.youtube.com/watch?v=iEBX_ouEw1I

Map: Olmsted Brothers’ revised preliminary plan for Volunteer Park, Seattle, 1909 Courtesy National Park Service Frederick Law Olmsted National Historic Site (02695-43). https://historylink.org/File/20839

undefined

Just say yes!

When I first began to explore my creative tendencies, it was shortly after my dad died. I remember feeling lost and depressed. Being in Seattle, so far from the family that I love and adore, I started to dabble in photography. As a way to help reconnect me to the memory of my father (who had a deep love for photography), I purchased my very first DSLR. Together with my best friend (who is an amazing hair stylist), I began to plan and shoot fashion photoshoots. With each project, my love for art grew. And my subject matter widened. Portraits, events, families, and soon wedding engagements. Some images from that period of my life are attached below.

As a popular hair stylist, my best friend helped to connect me to potential clientele. One such client was a couple looking for wedding photos. My initial inclination was to say no. After all, weddings are such important events for couples. If I messed up, that would be huge. But as is my go to intuition, I decided to dive in, reading everything I could get my hands on, watching youtube tutorials, visiting Glazers to ask a million to one questions, doing mock shoots with models to test light and different lenses. It was a time of much growth. Thankfully, I was able to successfully photograph their wedding. I remember how happy they were. Despite my initial anxiety, I’m grateful that I said yes. And on a funny note (at least in retrospect), directly following the wedding, I ended up feeling broken, both in body and in spirit. Photographing for 10 hours straight, without a second shooter, I was spent. Looking back at the experience, I am proud of myself for taking on the challenge. I’ve gone ahead and attached a couple of my favorite photos from their wedding.